Pages

Wednesday, January 31, 2018

POST with HttpUrlConnection

A shot note on POST requests:

public InputStream post(String url, String params) throws IOException {
    URL u = new URL(url);
    HttpURLConnection con = (HttpURLConnection) u.openConnection();
    con.setRequestMethod("POST");
    con.setDoOutput(true);
    try (OutputStreamWriter out = new OutputStreamWriter(con.getOutputStream())) {
        out.write(params);
    }

    return con.getInputStream();
}

GET request much simpler:

    String getAmazonHostName() throws  IOException {
        URL url = new URL("http://169.254.169.254/latest/meta-data/public-hostname");
        try (BufferedReader in = new BufferedReader( new InputStreamReader(url.openStream()))) {
            String inputLine = in.readLine();
            System.out.println("amazon public hostname: " + inputLine);
            return inputLine;
        }
    }

Tuesday, January 30, 2018

Switching off automatic discovery of resource classes and providers in JAX-RS by explicitely registering them

Switching on/off automatic discovery of resource classes and providers in JAX-RS

The automatic discovery may complicate things when provider classes are included in the libraries used by an application or preinstalled in a server, for example Jackson-related jar in Wildfly. So I prefer to switch off every features I am not aware of. The JAX-RS specification states:

  • When an Application subclass is present in the archive, if both Application.getClasses and Application.getSingletons return an empty collection then all root resource classes and providers packaged in the web application MUST be included and the JAX-RS implementation is REQUIRED to discover them automatically by scanning a .war file as described above.
  • If either getClasses or getSingletons returns a non-empty collection then only those classes or singletons returned MUST be included in the published JAX-RS application.

So, essentially if methods getClasses and getSingletons are not overriden the resource classes and providers are discovered automatically. Let's use two root resource classes to illustrate the rule. The full illustration code is available in Github.

@Path("/registered")
public class MyRegisteredResource {

    @GET
    public String getBook() {
        return "Hello Registered World!";
    }
}

@Path("/unregistered")
public class MyUnregisteredResource {

    @GET
    public String getBook() {
        return "Hello Unregistered World!";
    }
}

Both resources operate if the Application class is empty:

@ApplicationPath("/api")
public class MyApplication extends Application {
}

If I override getClasses method, only the resource class returned by the method will function:

@ApplicationPath("/api")
public class MyApplication extends Application {

    @Override
    public Set<Class<?>> getClasses() {
        return new HashSet<Class<?>>() {
            {
                add(MyRegisteredResource.class);
            }
        };
    }
}
In which method to register a class?

Quotes from the JAX-RS specification on the Lifecyle of providers and resource classes :

  • By default a new resource class instance is created for each request to that resource.
  • By default a single instance of each provider class is instantiated for each JAX-RS application.
  • By default, just like all the other providers, a single instance of each filter or entity interceptor is instantiated for each JAX-RS application.

So the root resource classes should be returned by getClasses, whereas providers, including filters, by getSingletons method.

Getting the standard servlet defined types such as HttpServletRequest in ContainerRequestFilter

The worst feature of JAX-RS filters is there is not straightforward way to access HttpServletRequest instance. The reference to HttpServletRequest can be injected into managed classes using @Context annotation. However, according to the specification the filters have to be instantiated singletons. That means that injection will not work.

If you want to access in a filter any of the standard servlet arguments such as HttpServletRequest, HttpServletResponse, ServletConfig, ServletContext, the filter will have to be registered in getClasses, so that its instance is created and injected for each request. Otherwise injection is impossible and without it there is no way to access the servlet-defined types.

Monday, January 29, 2018

Aligning horizontally and vertically a div with absolute position and unknown size inside a div

When the size of the div with absolute position is unknown, the simplest solution is using translate function. Obviously, the container is not static.

.absolute1 {
    position:absolute;
    background-color: antiquewhite;     
    top: 50%;
    left: 50%;
    transform: translate(-50%, -50%);
}

Relative Container, Relative Container, Relative Container, Relative Container, Relative Container

Relative Container, Relative Container, Relative Container, Relative Container, Relative Container

Relative Container, Relative Container, Relative Container, Relative Container, Relative Container

Relative Container, Relative Container, Relative Container, Relative Container, Relative Container

Relative Container, Relative Container, Relative Container, Relative Container, Relative Container

Relative Container, Relative Container, Relative Container, Relative Container, Relative Container

Relative Container, Relative Container, Relative Container, Relative Container, Relative Container

Relative Container, Relative Container, Relative Container, Relative Container, Relative Container

Relative Container, Relative Container, Relative Container, Relative Container, Relative Container

Relative Container, Relative Container, Relative Container, Relative Container, Relative Container

Relative Container, Relative Container, Relative Container, Relative Container, Relative Container

Element with absolute position and unknown size

Element with absolute position and unknown size

Element with absolute position and unknown size

By the way, many authors suggest a solution that works only for divs with height and width set:

.absolute2{
    position:absolute;
    background-color: antiquewhite;    
    top: 0; 
    left: 0; 
    bottom: 0; 
    right: 0;
    margin: auto;
    width:50%;
    height:30%;
}

Relative Container, Relative Container, Relative Container, Relative Container, Relative Container

Relative Container, Relative Container, Relative Container, Relative Container, Relative Container

Relative Container, Relative Container, Relative Container, Relative Container, Relative Container

Relative Container, Relative Container, Relative Container, Relative Container, Relative Container

Relative Container, Relative Container, Relative Container, Relative Container, Relative Container

Relative Container, Relative Container, Relative Container, Relative Container, Relative Container

Relative Container, Relative Container, Relative Container, Relative Container, Relative Container

Relative Container, Relative Container, Relative Container, Relative Container, Relative Container

Relative Container, Relative Container, Relative Container, Relative Container, Relative Container

Relative Container, Relative Container, Relative Container, Relative Container, Relative Container

Relative Container, Relative Container, Relative Container, Relative Container, Relative Container

Element with absolute position and known size

Element with absolute position and known size

Element with absolute position and known size

Saturday, January 27, 2018

Enabling SSL in Wildfly using a free certificate from Let's Encrypt

Let’s Encrypt is a free Certificate Authority. To enable HTTPS on a website, one needs to get a certificate from a Certificate Authority. Let’s Encrypt recommends to use Certbot - a tool that validates your ownership over the target domain and fetches the certificates.

Intalling Certbot on CentOS7
sudo yum install epel-release
sudo yum install certbot
Validating a domain to fetch a certificate

Fetching certificates is described in detail in thethe official documentation, which needs to be consulted to understand the command below. Briefly, Certbot attempts to validate that you own the domain for which you ask a certificate. When a user opts for http-based verification, Certbot asks to create two files with tiny contents specified by Certbot so that they are accessible at some urls in your domain also specified by Certbot.

sudo certbot certonly --manual --preferred-challenges http -d food-diary-online.com -d www.food-diary-online.com --manual-auth-hook /opt/SSLCertificates/authenticator.sh --non-interactive --manual-public-ip-logging-ok

--manual-auth-hook option points on the script authenticator.sh creating files in a web application folder .well-known/acme-challenge that is accessible by CertBot via web:

#!/bin/bash

TARGET_DIR=/opt/wildfly-10.1.0.Final/standalone/deployments/FoodApp.war/.well-known/acme-challenge
mkdir -p $TARGET_DIR
echo $CERTBOT_VALIDATION > $TARGET_DIR/$CERTBOT_TOKEN

As the result the certificates are downloaded

Strangely, a normal user could not access the certificates because of the permissions on the created by Certbot parent folders. So I adjusted the permissions:

sudo chmod 755 /etc/letsencrypt/archive
sudo chmod 755 /etc/letsencrypt/live
cat /etc/letsencrypt/live/food-diary-online.com/fullchain.pem

The indicated directory /etc/letsencrypt/live/food-diary-online.com/ contains symbolic links privkey.pem and fullchain.pem to the most recently downloaded certificate files. For example, when I downloaded the certificates second time, the directory contents were:

What happens without manual-auth-hook

Certbot asks to create two files so that they are accessible at the specified urls. Without the authenticator script, the output is like:

Create a file containing just this data:

9-gBwqnje4DmxbrxaXX7E3-Rua2_-rY54JB6wsdCWqo.m1NBHzDLwknVhXjqDceEqOyC2Na8q0e1QJws4FCqErs

And make it available on your web server at this URL:

http://food-diary-online.com/.well-known/acme-challenge/9-gBwqnje4DmxbrxaXX7E3-Rua2_-rY54JB6wsdCWqo

--Press Enter to Continue--

Create a file containing just this data:

VNDE0iHhEQccJuFcDFF3X-FwsaxItyFlfE0GGy_6ixI.m1NBHzDLwknVhXjqDceEqOyC2Na8q0e1QJws4FCqErs

And make it available on your web server at this URL:

http://www.food-diary-online.com/.well-known/acme-challenge/VNDE0iHhEQccJuFcDFF3X-FwsaxItyFlfE0GGy_6ixI

--Press Enter to Continue--


IMPORTANT NOTES:
 - Congratulations! Your certificate and chain have been saved at:
   /etc/letsencrypt/live/food-diary-online.com/fullchain.pem
   Your key file has been saved at:
   /etc/letsencrypt/live/food-diary-online.com/privkey.pem
   Your cert will expire on 2018-04-26. To obtain a new or tweaked
   version of this certificate in the future, simply run certbot
   again. To non-interactively renew *all* of your certificates, run
   "certbot renew"

During this process I just created the requested files in a war deployed into the Wildfly:

Importing the private key with the fetches certificate into a Java key store (jks)

The following files has been created:

  • privkey.pem - Private key for the certificate.
  • fullchain.pem - The server certificate followed by intermediate certificates that web browsers use to validate the server certificate.

However, Wildfly 10 accepts only jks. So the fullchain.pem has to be imported into jks. However, keytool can import a certificate or an entire keystore, but does not import a private key separated from the paired public key with the certificate. Therefore, a private key has to be combined with the certificate in a acceptable PKCS12 keystore with openssl command. Then the keystore can be imported into jks. The keystore will be created in /opt/SSLCertificates/

cd /opt/SSLCertificates/
openssl pkcs12 -export -in /etc/letsencrypt/live/food-diary-online.com/fullchain.pem -inkey /etc/letsencrypt/live/food-diary-online.com/privkey.pem -out keystore.p12 -name wildfly -passout pass:changeit

changeit is the password for the keystrore to be created. File keystore.p12 is created.

keytool -importkeystore -deststorepass changeit -destkeypass changeit -destkeystore keystore.jks -srckeystore keystore.p12 -srcstoretype PKCS12 -srcstorepass changeit -v -noprompt

Jks keystore.jks is created when the command is executed for the first time. During the second import the existing alias will be overwritten:

Configuring SSL in Wildfly

Stop the server and edit standalone.xml so that it contains:

<security-realm name="ApplicationRealm">
    <server-identities>
     <ssl>
            <keystore path="/opt/SSLCertificates/keystore.jks" keystore-password="changeit" alias="wildfly" key-password="changeit"/>
        </ssl>
    </server-identities>
    <authentication>
        <local default-user="$local" allowed-users="*" skip-group-loading="true"/>
        <properties path="application-users.properties" relative-to="jboss.server.config.dir"/>
    </authentication>
    <authorization>
        <properties path="application-roles.properties" relative-to="jboss.server.config.dir"/>
    </authorization>
</security-realm>

Start the server. Well, that's it, we're done.

Automatic certificate renewal Incomplete yet

The only problem with the Let's Encrypt certificates is that they last for 90 days, so they have to be regularly renewed. This can be achieved with a script scheduled in crontab.

cerbot renew command attempts to renew any previously-obtained certificates that expire in less than 30 days. The same plugin and options that were used at the time the certificate was originally issued will be used for the renewal attempt, unless you specify other plugins or options. renew can be run as frequently as you want since it will usually take no action.

I created deployhook.sh script in /opt/SSLCertificates/. The script merely executes the commands used above to import the certificates into the java keystore and restart wildfly.

#!/bin/bash

service wildfly stop

cd /opt/SSLCertificates/
openssl pkcs12 -export -in /etc/letsencrypt/live/food-diary-online.com/fullchain.pem -inkey /etc/letsencrypt/live/food-diary-online.com/privkey.pem -out keystore.p12 -name wildfly -passout pass:changeit

keytool -importkeystore -deststorepass changeit -destkeypass changeit -destkeystore keystore.jks -srckeystore keystore.p12 -srcstoretype PKCS12 -srcstorepass changeit -v -noprompt

service wildfly start

Now, to renew certificates one single-line command is sufficient. The script indicated by --deploy-hook is executed only after a successful certificate renewal.

sudo certbot renew --deploy-hook deployhook.sh

The output of the command:

[centos@ip-172-31-42-159 SSLCertificates]$ sudo certbot renew --deploy-hook ./deployhook.sh
Saving debug log to /var/log/letsencrypt/letsencrypt.log

-------------------------------------------------------------------------------
Processing /etc/letsencrypt/renewal/food-diary-online.com.conf
-------------------------------------------------------------------------------
Cert is due for renewal, auto-renewing...
Plugins selected: Authenticator manual, Installer None
Starting new HTTPS connection (1): acme-v01.api.letsencrypt.org
Renewing an existing certificate
Performing the following challenges:
http-01 challenge for food-diary-online.com
http-01 challenge for www.food-diary-online.com
Waiting for verification...
Cleaning up challenges
Running deploy-hook command: ./deployhook.sh
Output from deployhook.sh:
Stopping wildfly (via systemctl):  [  OK  ]
Starting wildfly (via systemctl):  [  OK  ]

Error output from deployhook.sh:
Warning: Overwriting existing alias wildfly in destination keystore
Entry for alias wildfly successfully imported.
Import command completed:  1 entries successfully imported, 0 entries failed or cancelled
[Storing keystore.jks]


-------------------------------------------------------------------------------
new certificate deployed without reload, fullchain is
/etc/letsencrypt/live/food-diary-online.com/fullchain.pem
-------------------------------------------------------------------------------

-------------------------------------------------------------------------------

Congratulations, all renewals succeeded. The following certs have been renewed:
  /etc/letsencrypt/live/food-diary-online.com/fullchain.pem (success)
-------------------------------------------------------------------------------
[centos@ip-172-31-42-159 SSLCertificates]$

To automate the renewals, the command has to be scheduled in the crontab.

Thursday, January 25, 2018

Login into a web application with Facebook via redirect

Like Google, the Facebook documentation on login includes two options: using Facebook Javascript SDK and without it. I used the second option, manually building a login flow, to create a Javascript-free login flow for the back-end.

In my simple web application the flow is as follows:

  • When the login button is click, the user is redirected to the facebook page. The login button is inside an anchor tag:

    <a href="https://www.facebook.com/v2.12/dialog/oauth?client_id=407938939637716&redirect_uri=http://localhost:8080/test/facebook&scope=email&response_type=code&state=http://localhost:8080/test/|1462070876
    ">

    The url contains the following parameters:

    • client_id from the app's dashboard.
    • redirect_uri will receive the response from the Facebook login. The uri must be whitelisted in the App Dashboard.
    • state maintains state between the request and callback. It will be appended unchanged to the redirect_uri.
    • response_type:
      • code - the response data is included as URL parameters and contains code parameter. The data is accessible to the back-end.
      • token - the response data is included as a URL fragment and contains an access token. The response hash can be accesses only on the client by javascript.
    • scope - a list of Permissions to request from the person using your app. Note, even if you request the email permission it is not guaranteed you will get an email address. For example, if someone signed up for Facebook with a phone number instead of an email address, the email field may be empty.
  • After a login attempt, the browser is redirected to the redirect_uri with appended response paremeters code and state:

    http://localhost:8080/test/facebook?code=AQAlQPnW9Vbft-F8DW_ybmgjnk5fJ9ok7YiOglNDvougkpDUYyOC4D5gdhWQ4o54cYcVE9bihhvKjO6HRIQCXNIhLW6jUlaCvehwScSXbE9U3zDKBsbJo-uvMgPc9xJbzKAunmIdr3dDjJ72-SKqipvEYTkHtKksbVDEfbUR4DRL6ei8SQyf7A-8ULAGhZhJAgLsqfKYkqal2GzgbxtK3npvBS1OiWZFZvlGirHPbnOpM80EO5E7WDBqG7GsSR9c6lM6Xudehpo7U9OacW5h2XDwIuVTCFg3pNgtiptkotEimhBgigdgWTLFJJgYzFhYRrfj3O-ksbcAknd_nqUvYFfgewJo-5ejJ4HL1fGdzlrF-A&state=http%3A%2F%2Flocalhost%3A8080%2Ftest%2F%7C1462070876

    The state values in the original request and the response are the same. The code has to be included in a GET request to another endpoint. Additionally, client_id, redirect_uri used in the initial request, and client_secret from the App Dashboard are required.

    https://graph.facebook.com/v2.12/oauth/access_token?code=AQAlQPnW9Vbft-F8DW_ybmgjnk5fJ9ok7YiOglNDvougkpDUYyOC4D5gdhWQ4o54cYcVE9bihhvKjO6HRIQCXNIhLW6jUlaCvehwScSXbE9U3zDKBsbJo-uvMgPc9xJbzKAunmIdr3dDjJ72-SKqipvEYTkHtKksbVDEfbUR4DRL6ei8SQyf7A-8ULAGhZhJAgLsqfKYkqal2GzgbxtK3npvBS1OiWZFZvlGirHPbnOpM80EO5E7WDBqG7GsSR9c6lM6Xudehpo7U9OacW5h2XDwIuVTCFg3pNgtiptkotEimhBgigdgWTLFJJgYzFhYRrfj3O-ksbcAknd_nqUvYFfgewJo-5ejJ4HL1fGdzlrF-A&client_id=407938939637716&client_secret=7fd6fa037e097fcf002fb350b815f5b3&redirect_uri=http://localhost:8080/test/facebook

    The response is a Json containing an access_token.

    {"access_token":"EAAFzBKZBWT9QBABhRNBOKwQZBMza2siRzUZBeQHi0Jp2qrXijTEnbVijy4ZAjnTzBzigZA11Vh4RhZBZB2DDu1n8fEJBdBh5mxFETqJJFLLHQnkG0XyffthKg2tU62csiCvsCHxiVOMuZAWy2lS74sKLTbL8sC8EgLEZD","token_type":"bearer","expires_in":5181583}

    That the difference from Google sign in. In Google additionally id_token with the user's detail is received. In Facebook an additional request is required.

  • Using the received access token, the sever-side code makes yet another GET request retrieves a user email from the Graph API. The /me node is a special endpoint that translates to the user_id of the person whose access token is currently being used to make the API calls. Access tokens are portable. Graph API calls can be made from clients or from your server on behalf of clients. The calls to the Graph API are better secured by adding appsecret_proof parameter.

    https://graph.facebook.com/v2.12/me?access_token=EAAFzBKZBWT9QBABhRNBOKwQZBMza2siRzUZBeQHi0Jp2qrXijTEnbVijy4ZAjnTzBzigZA11Vh4RhZBZB2DDu1n8fEJBdBh5mxFETqJJFLLHQnkG0XyffthKg2tU62csiCvsCHxiVOMuZAWy2lS74sKLTbL8sC8EgLEZD&debug=all&fields=email&format=json&method=get&pretty=0&appsecret_proof=34b9499185c81a1f37a68cb3b012ae2dcb6882d8066dc58c88641247c28bbce9
    

    The response is a json:

    {"email":"dummy000@mail.ru","id":"10215579219697013","__debug__":{}}

    The retrieved email is used to log the user into the web application.

In App Dashboard I used such security settings:

The option below allows only the API calls that either include appsecret_proof or are made from the same device the token was issued.

Wednesday, January 24, 2018

Generating MD5, SHA-1, SHA-256, SHA-384, SHA-512 message digests

Just a note within sight. To generate hashes using any possible algorithms, I use digest method of a Java class:

public class MessageHash {

    static String DEFAULT_ALGORITHM = "SHA-1"; // MD5, SHA-1, SHA-256, SHA-384, SHA-512

    static String digest(String input, String algorithm) throws NoSuchAlgorithmException {
        MessageDigest md = MessageDigest.getInstance(algorithm);
        return HexConverter.bytesToHex(md.digest(input.getBytes()));
    }

    public static String digest(String input) {
        try {
            return digest(input, DEFAULT_ALGORITHM);
        } catch (NoSuchAlgorithmException ex) {
            throw new RuntimeException("This is impossible");
        }
    }
}

HmacSHA256 - sha256 hash using a key (for appsecret_proof in Facebook)

Unlike Google, in Facebook access tokens are portable - they can be used without client or app id. To kind of protect or rather label them, all Graph API calls from a server (only server) should secured by adding a parameter appsecret_proof set to the sha256 hash of the access token generated using the app secret as the key.

Here is an example of how to do it on a Java server:

public class Sha256Digest {

    Mac mac;
     
    Sha256Digest() throws UnsupportedEncodingException, NoSuchAlgorithmException, InvalidKeyException {
        this(APP_SECRET);
    }

    Sha256Digest(String key) throws UnsupportedEncodingException, NoSuchAlgorithmException, InvalidKeyException {
        SecretKeySpec sk = new SecretKeySpec(key.getBytes(StandardCharsets.UTF_8.toString()), "HmacSHA256");
        mac = Mac.getInstance("HmacSHA256");
        mac.init(sk);
    }

    String hash(String msg) throws UnsupportedEncodingException {
        return HexConverter.bytesToHex(mac.doFinal(msg.getBytes(StandardCharsets.UTF_8.toString())));
    }

    public static void main(String[] args) throws Exception {
        System.out.println(new Sha256Digest().hash("Test"));
    }
}

For converting an array of bytes into a string of hexadecimal values I use an additional class:

public class HexConverter {

    private final static char[] HEXARRAY = "0123456789abcdef".toCharArray();

    public static String bytesToHex(byte[] bytes) {
        char[] hexChars = new char[bytes.length * 2];
        for (int j = 0; j < bytes.length; j++) {
            int v = bytes[j] & 0xFF;
            hexChars[j * 2] = HEXARRAY[v >>> 4];
            hexChars[j * 2 + 1] = HEXARRAY[v & 0x0F];
        }
        return new String(hexChars);
    }
}

The resulting string can be included in Facebook calls like:

https://graph.facebook.com/v2.11/me?access_token=EAAFzBKZBWT9QBAFXEDBfdKu8Q7cDXZAWXSaZAIKuDZB04A5mAlCTMpXKgBJNd42MXZAo5Gk8ZAv8u6mjCXGLfLTjT6ORikMLWOCFTxbaxHqcOfpJU7iGIyk5xKozSv0HG4ctm0wpE2xHriZCeITEQZAKWbHoveuj2xbGSBvdPhE8uX5HXtEdgUkc82XNZAuQSLi8ZD&debug=all&fields=email&format=json&method=get&pretty=0&appsecret_proof=734e6e019eb20821682797320845f1df2e813f01cc779cbcd94bb55a9a37457f

To prevent API calls lacking the proof, Require App Secret switch should be activated in the application settings. Only allow calls from a server and require app secret or app secret proof for all API calls.

Using JSON-P to parse heterogeneous JSON in HTTP responses

Suppose you need to query Facebook Graph API. The responses to your HTTP requests have JSON format. A very convinient Java API for JSON Processing helps to parse and query the heterogeneous JSON responses.

For example, I try to get an email of the user whose access token was obtained after the user's login into my application. For this, I access url like:

https://graph.facebook.com/v2.11/me?access_token=EAAFzBKZBWT9QBAHzWcGGSy5GepjlS9S1YEPvN1p2jwaGxc0QZCaVoAZCmsZB8YaE1AkegbmObdBDY64DDD1t1kxezOgpEFKbbLKlyQyPcEiyUZCwSI3iJOhe9ioahZA9Ye6hvOybhzGeOODFdihEnPbuw5sso5CzPEZAQL1RkdM3cfKajOdKsPmMWOvNhrDtE0ZD&debug=all&fields=email&format=json&method=get&pretty=0

The reponse is a JSON with some hexadecimal digits encoding @ character:

{"email":"marian.caikovski\u0040mail.ru","id":"10215579219697013","__debug__":{}}

To easily execute an HTTP request, parse the response and get the decoded email property I use:

String readUserEmailFromGraphAPI(String token) throws IOException {
    try (JsonReader jsonReader = Json.createReader(
            new InputStreamReader(
                    new URL("https://graph.facebook.com/v2.11/me?access_token=" + token + "&debug=all&fields=email&format=json&method=get&pretty=0")
                            .openStream()))) {
        JsonObject obj = jsonReader.readObject();
        return obj.getString("email");
    }
}

How to get a request url hash on the back end server. Reconstructing the full request url in a servlet.

It is impossible, the browser does not include the hash into the request url sent to the server:

Just a note for myself on what values of the request path can be extracted from HttpServletRequest in a servlet:

The full request path can be reconstructed by a function like:

request.getRequestURL() + (request.getQueryString() != null ? ("?" + request.getQueryString()) : "")

Monday, January 22, 2018

How to activate gzip compression of selected content types in Tomcat or Wildfly

Another note for myself. To enable gzip compression in tomcat add an additional attribute to Connector tag in CATALINA_HOME/conf/server.xml:

<Connector port="8080" protocol="HTTP/1.1" connectionTimeout="20000" redirectPort="443" compressibleMimeType="application/javascript,text/css,application/json" compression="on"/>

Wildfly is not so well documented as Tomcat. So this note assembled from pieces of information saves time. Essentially one needs to enable and configure gzipFilter using Undertow predicates. Edit the default configuration file standalone.xml:

<subsystem xmlns="urn:jboss:domain:undertow:3.1">
    <buffer-cache name="default"/>
    <server name="default-server">
        <http-listener name="default" socket-binding="http" redirect-socket="https" enable-http2="true"/>
        <https-listener name="https" socket-binding="https" security-realm="ApplicationRealm" enable-http2="true"/>
        <host name="default-host" alias="localhost">
            <location name="/" handler="welcome-content"/>
            <access-log pattern="%h %t "%r" %s "%{i,User-Agent}"" prefix="myaccess."/>
            <filter-ref name="gzipfilter" predicate="regex[pattern='text/html|text/css|application/javascript|application/json',value=%{o,Content-Type}] and max-content-size[value=1024]"/>
        </host>
    </server>
    <servlet-container name="default">
        <jsp-config/>
        <persistent-sessions path="sessions" relative-to="jboss.server.temp.dir"/>
        <websockets/>
    </servlet-container>
    <handlers>
        <file name="welcome-content" path="${jboss.home.dir}/welcome-content"/>
    </handlers>
    <filters>
        <gzip name="gzipfilter"/>
    </filters>
</subsystem>

All the possible predicates are listed in Undertow documentation. Some people use url-based predicates like:

<filter-ref name="gzipFilter" predicate="path-suffix['.css'] or path-suffix['.js']" />

Alternatively, one can use a custom gzip compression servlet filter that can be more easily configured to target some specific output. A working example is in GitHub. I keed this sample only because it works well and its GIPOutputStream potentially could be replaced by some other stream to for example encrypt the output or produce hashes.

Google Sign in into a website using redirect ux_mode

Google Javascript client library used for sign in is built on the OpenID Connect protocol, which is straightforward. The library uses the implicit flow whereby tokens are passed in url hash. It is not a good option for server side authentication. It differs from a less complicated basic/server flow in which tokens are passed as url parameters. The server flow I describe in a separate post.

Google Sign-In for Websites documentation provides only examples where users sign in via a Google popup. I adapted their code so that another redirect, which is another consent flow option, is used. I also added a primitive backend code that process the ID token. In my sample web application saved to GitHub, the entire consent flow happens in one window without any popups because the initialization is launched with following parameters:

gapi.auth2.init({
            client_id: clientId,
            fetch_basic_profile: false, 
            scope: 'email',
            ux_mode: 'redirect', 
            redirect_uri: 'http://localhost:8080/test/' 
        })

The application can be deployed to Tomcat or anywhere, but first a client id should be generated in google API console and copied to Constants class.

For the unauthenticated users the welcome page displays only the standard Google Sign-In button that meets the strict Google branding guidelines.

On clicking the button the browser is redirected to Google authentication page.

If the user has only one account in Google and he is already signed in, he is immediatly redirected by to the original page. Otherwise, the user has to select with what account to sign in and then upon authentication, the user is redirected back to the original page. To imitate a complete process of authentication, the page forwards the received from google ID token to the REST resource in the Java backend. The backend process the id, and sends back a JSON with the user's email. So for the authenticated users the only page displays their email received from the Java backend and a link for signing out.

Thursday, January 18, 2018

Resizing selected pictures a browser before uploading them to a REST resource in a backend

The sample application uploads multipart data comprising data from several text inputs together with several photo files select in file type input to a JAX-RS rest resource. Note, multipart data is not mentioned in JAX-RS specification. So the back end uses RESTEasy-specific features. Before uploading, the files are resized in the browser. Then, they are scaled down to thumbnails in the back end.

The web application is adapted for Wildfly, but it works as well with Tomcat if the scope of RESTEasy-related dependencies is changed from provided to the default by removing it.

How to style a file input

The input will accept multiple but only images. One cannot change much the file type input. A workaround is to use a label tag and hide the input with css. Note, the ugly styling here serves merely to demonstrate that styling is possible.

<label id='dropbox' for='fileInput'><img src="imgs/File-Upload-icon.png"/>Select photos</label>
<input id='fileInput' type="file" accept="image/*" multiple />

A sample css:

input[type=file] {
    display: none;
}
label img {
    max-height: 1.5em;
}

label {
    border: 1px solid;
    display: inline-block;
    padding: 0.3em;
}
Resizing selected files using canvas and its function onBlob

The unique resized files are stored in an array:

var selectedFiles = []; // the array with the unique resized files that will be uploaded

When new pictures are selected using the file input, a change event listener is invoked:

$('input[type=file]').change(function () {
    resizeAndShowThumbs(this.files);
});
function resizeAndShowThumbs(files) {
    for (var c = 0; c < files.length; c++) {
        var file = files[c];
        if (file.type.startsWith("image/") && isFileNotYetIncluded(file)) {
            resize(file, showThumb);
        }
    }
}
function isFileNotYetIncluded(file) {
    for (var c = 0; c < selectedFiles.length; c++) {
        if (selectedFiles[c].originalNameSize.equals(file)) { // file has name and size read-only properties
            return false;
        }
    }
    return true;
}

The event listener calls the resize function only if a file is not yet included in the array. The files are identified by their names and initial sizes. After a file is resized the callback showThumb is called.

function showThumb(file) {
    selectedFiles.push(file);
    showMessage();
    $previewList.append('<li><p>' + file.originalNameSize.name + '</p><img src="' + URL.createObjectURL(file)
            + '"  onload="window.URL.revokeObjectURL(this.src);"/></li>');
}

The resized picture have jpeg compression. The problem with resizing is that sometimes a resized jpeg-compressed file is has a bigger size than the source file with bigger dimensions. So the file with smaller size is selected between the source and resized files. On the back-end the pictures are converted into thumbnails using ImageIO class, which accepts only jpg, bmp, gif, png formats. In the unlikely case of the source file having an unacceptable format, the resized jpeg file will be uploaded even if it is bigger.

var MAX_SIZE = 1200, MIME = 'image/jpeg', JPEG_QUALITY = 0.95;
// the files types accepted by java ImageIO
var acceptableTypes = ["image/gif", "image/png", "image/jpeg", "image/bmp"]; 

function size(size) {
    var i = Math.floor(Math.log(size) / Math.log(1024));
    return (size / Math.pow(1024, i)).toFixed(2) * 1 + ['b', 'kb', 'Mb'][i];
}

function resizePhoto(file, callback) {
    var image = new Image();
    image.onload = function ( ) {
        URL.revokeObjectURL(this.src);
        var canvas = document.createElement('canvas');
        var width = this.width;
        var height = this.height;

        if (width > height) {
            if (width > MAX_SIZE) {
                height *= MAX_SIZE / width;
                width = MAX_SIZE;
            }
        } else {
            if (height > MAX_SIZE) {
                width *= MAX_SIZE / height;
                height = MAX_SIZE;
            }
        }

        canvas.width = width;
        canvas.height = height;
        canvas.getContext('2d').drawImage(image, 0, 0, width, height);
        canvas.toBlob(callback.bind(null, this.width, this.height, width, height), MIME, JPEG_QUALITY);
    };
    image.src = URL.createObjectURL(file);
}


function chooseSmallerFile(file, resizedFile) {
    if (file.size > resizedFile.size) {
        console.log('the resized file is smaller');
        return resizedFile;
    } else {
        // resized is bigger than the original
        // however, java ImageIO supports only  jpg, bmp, gif, png, which perferctly match mime types, the front-end should send only those types
        // if the file type is none of image/gif, image/png, image/jpeg, image/bmp use the bigger resized file
        console.warn('resized is bigger the the original');
        if (acceptableTypes.indexOf(file.type) >= 0) {
            return file;
        } else {
            console.warn('but the source file type is unacceptable: ' + file.type);
            return  resizedFile;
        }
    }
}

 function resize(file, callback) {
    resizePhoto(file, function (originalWidth, originalHeight, resizedWidth, resizedHeight, resizedFile) {
        console.log('filename=' + file.name + '; size=' + size(file.size) + '=>' + size(resizedFile.size)
                + '; dimensions=' + originalWidth + '/' + originalHeight + '=>' + resizedWidth + '/' + resizedHeight);
        var smallerFile = chooseSmallerFile(file, resizedFile);
        smallerFile.originalNameSize = new NameAndSize(file.name, file.size); // name is erased in the resized file. the name and size are used to select unique files
        callback(smallerFile);
    });
};

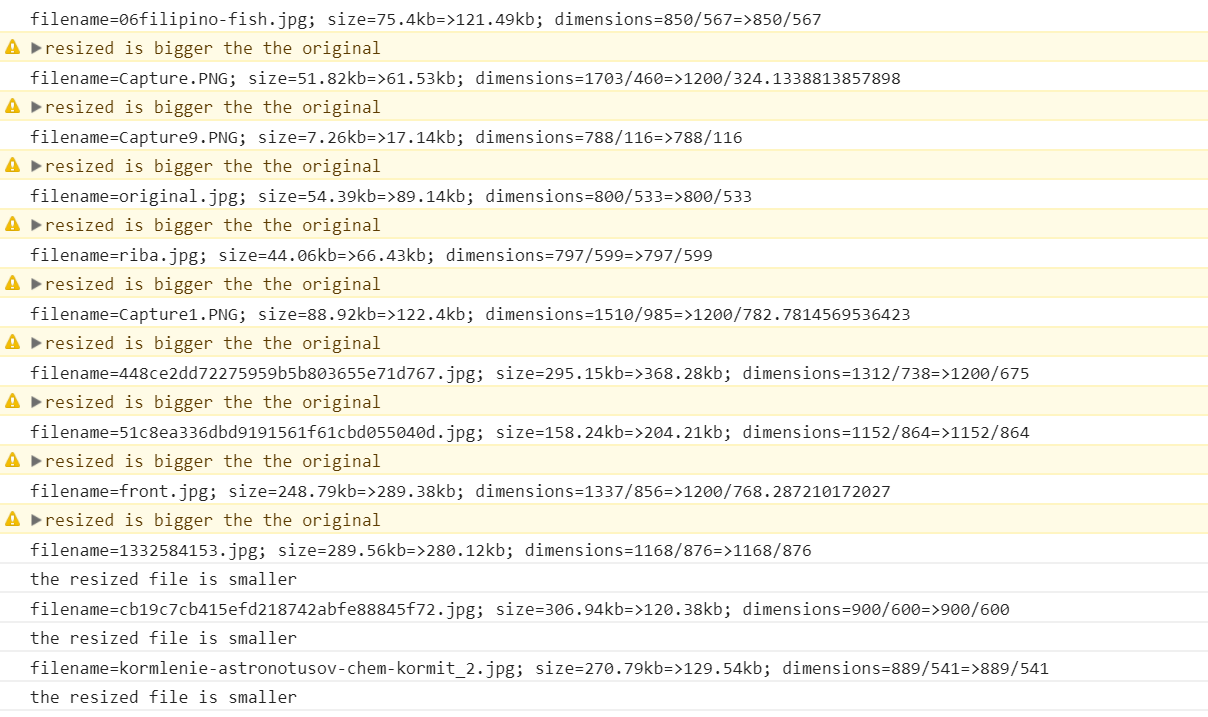
The resizing code produces in the console lots of file size related debug messages. For example, when many pictures coming from different sources are selected:

The console messages indicate that sometimes it is cheaper to upload the original file with the bigger dimensions:

Dragging and dropping photos

Instead of clicking the file input label, one can drop on it the files dragged from any file browser. To implement drag and drop, only few lines are required:

$('#dropbox').on("dragenter", onDragEnter).on("dragover", onDragOver).on("drop", onDrop);

function onDragEnter(e) {
    e.stopPropagation();
    e.preventDefault();
}

function onDragOver(e) {
    e.stopPropagation();
    e.preventDefault();
}

function onDrop(e) {
    e.stopPropagation();
    e.preventDefault();
    resizeAndShowThumbs(e.originalEvent.dataTransfer.files);
}

How the resized photos together with values from other inputs can be posted as multipart form data to a REST resource is described in a separate post, because this one would be to long.

Tuesday, January 16, 2018

Using cron to schedule scripts accessing the target files via relative paths. Disabling emails with the cron output

It is another note for myself. Under Linux task execution is easy to schedule with cron service. The service can execute script as the indicated user. crond service reads /etc/crontab: once a minute. If crontab file has been modified, cron service does not need to be restarted. Any output from the executed script is mailed to user, e.g. root, whose name is assigned to MAILTO environment variable in the crontab. If the recipient is not you but your admin, he might not be happy with lot of spam. To disable repetitive emails with the output of executed jobs add

&> /dev/null
to the end of the each scheduled command.

A sample /etc/crontab:

SHELL=/bin/bash
PATH=/sbin:/bin:/usr/sbin:/usr/bin
MAILTO=root
MYDIR="/data/apache-tomcat-8.5.13/bin"

# For details see man 4 crontabs

# Example of job definition:
# .---------------- minute (0 - 59)
# |  .------------- hour (0 - 23)
# |  |  .---------- day of month (1 - 31)
# |  |  |  .------- month (1 - 12) OR jan,feb,mar,apr ...
# |  |  |  |  .---- day of week (0 - 6) (Sunday=0 or 7) OR sun,mon,tue,wed,thu,fri,sat
# |  |  |  |  |
# *  *  *  *  * user-name  command to be executed
1  23  *  *  *  test  $MYDIR/clearLogs.sh &> /dev/null
Script deleting outdated files

For example, a script that copies MySQL contents and deletes the backups older than 3 days:

#!/bin/bash

MYSQL_DIR=/data/mysql
BACKUP_DIR=/data/mysqlDailyBackup
service mysqld stop
cp -r $MYSQL_DIR $BACKUP_DIR/mysql_`date +"%d-%m-%Y"`
service mysqld start
service httpd restart
find $BACKUP_DIR  -maxdepth 1 -mindepth 1 -type d -mtime 3 -exec rm -rf {} \;

Suppose, to be more portable, a script to be executed refers to the target files in some nested or sibling folders only via relative paths so that if the file path of the scheduled script changes nothing except the invoking line in the crontab has to be adjusted.

For example, the scheduled script is located in Tomcat bin folder and it simply deletes the outdated log files in Tomcat log folder. If the Tomcat is moved to some other location, to ensure that the automatic task is successfully executed, you one needs to adjust only the path to the script in crontab file, and nothing inside the script itself.

The parent folder path can be determined with a command:

script_parent_folder_path=$(dirname "$0")

A sample scheduled script deleting Tomcat log files that are older than one day:

#!/bin/bash
script_parent_folder_path =$(dirname "$0")
find $ script_parent_folder_path/../logs/ \( -name "*.log" -or -name "*.txt" \) -type f -mtime +1 -exec rm -f {} \;
Cron log

One can see the cron log in /var/log/cron.

Monday, January 8, 2018

Displaying all SQL commands executed by MySQL Connector/J driver in a buggy or Hibernate-based application

Activating hibernate loggers

While developing an application using JPA to access a database it is really useful to see how inefficient and numerous the executed SQL statements are. In fact, if you use any relations in entities you can be surprised to learn how many SQL statements are executed by Hibernate or Eclipselink to load an entity with relations. According to Hibernate documentation, the SQL statements can be displayed by enabling org.hibernate.SQL logger. It is enough to add a line into log4j.properties:

log4j.logger.org.hibernate.SQL=debug

However, the logged statements will be incomplete with question marks in place of any values. For example, the output can be similar to:

update users set date_format=? where user_id=?
delete from users where user_id=?

To see the hidden by default bind parameters, one needs to enable additional loggers:

log4j.logger.org.hibernate.type=trace
log4j.logger.org.hibernate.type.descriptor.sql=trace

But then the log becomes immense due to predominantly irrelevant output and thus quite illegible. So the point is - there is no standard way in Hibernate to see the executed SQL statements clean and complete. But there is an easy and universal workaround.

Using a customized MySQL logger

Even without JPA, while installing or debugging a poorly documented Java application, it helps to know what SQL commands fail or produce unexpected results. Recently, I have been installing and customizing such an application. Fortunately, it is an open source application and its code can be easily modified. Exposing the failing SQL statements helped me to make undocumented adjustments in the underlying MySQL database so that the application gradually started to function.

The SQL statements processed by MySQL driver can be displayed by adding property profileSQL to the connection URL.

jdbc:mysql://hostname/database?user=user&password=pass&useSSL=false&profileSQL=true

The default logger included in the SQL driver will be used to produce the output. The problem is that the output will include not only the executed SQL statements but also several times as many lines with irrelevant content such as pointless diagnostic messages, timestamps or empty space. Overall the output will be illegible. To record only SQL statements, I composed a customized logger class that filters out all the pollution.

package com.mysql.jdbc.log;

import java.util.Date;

import com.mysql.jdbc.profiler.ProfilerEvent;
import java.text.DateFormat;
import java.text.SimpleDateFormat;

 public class MyStandardLogger implements Log {
  
    public MyStandardLogger(String name) {
        this(name, false);
    }
 
    public MyStandardLogger(String name, boolean logLocationInfo) {
       
    }
 
    public boolean isDebugEnabled() {
        return true;
    }
 
    public boolean isErrorEnabled() {
        return true;
    }
 
    public boolean isFatalEnabled() {
        return true;
    }
 
    public boolean isInfoEnabled() {
        return true;
    }
 
    public boolean isTraceEnabled() {
        return true;
    }
 
    public boolean isWarnEnabled() {
        return true;
    }
 
    public void logDebug(Object message) {
        logInternal( message );
    }
 
    public void logDebug(Object message, Throwable exception) {
        logInternal( message );
    }
 
    public void logError(Object message) {
        logInternal( message );
    }
 
    public void logError(Object message, Throwable exception) {
        logInternal( message );
    }
 
    public void logFatal(Object message) {
        logInternal( message );
    }
 
    public void logFatal(Object message, Throwable exception) {
        logInternal( message );
    }
 
    public void logInfo(Object message) {
        logInternal( message );
    }
 
    public void logInfo(Object message, Throwable exception) {
        logInternal( message );
    }
 
    public void logTrace(Object message) {
        logInternal( message );
    }
 
    public void logTrace(Object message, Throwable exception) {
        logInternal( message );
    }
 
    public void logWarn(Object message) {
        logInternal(  message );
    }
 
    public void logWarn(Object message, Throwable exception) {
        logInternal( message );
    }
    DateFormat df = new SimpleDateFormat("HH:mm:ss.SSS");

    protected void logInternal(Object msg) {
        if (msg instanceof ProfilerEvent) {
            ProfilerEvent evt = (ProfilerEvent) msg;
            String evtMessage = evt.getMessage();

            if (evtMessage != null) {
                System.out.println(">SQL: " + df.format(new Date())+"\t"+evtMessage);
            }
        }
    }
}

The jar containing this class must be placed into the application class path. I put it into the same folder as the MySQL driver - CATALINA_HOME/lib.

In any ordinary application one would have only one place with the connection string. But to debug the application I needed to see the SQL statements received by JDBC driver from Connection created by DriverManger, and DataSource classes obtained from Tomcat or some Spring connection pools. So in some java class I modified the connection string:

String url ="jdbc:mysql://" + host + "/" + database +
                        "?user=" + userName + "&password=" + password +
                        "&zeroDateTimeBehavior=convertToNull&useSSL=false&profileSQL=true&logger=com.mysql.jdbc.log.MyStandardLogger";

In a Spring application context configuration xml one cannot use & sign, so the connections string looked like:

<bean id="businessDataSource" destroy-method="close" class="org.apache.commons.dbcp.BasicDataSource">
    <property name="driverClassName" value="${db.driver}"/>
    <property name="url" value="${db.connection_string}${db.portal_db_name}?zeroDateTimeBehavior=convertToNull&amp;useSSL=false&amp;profileSQL=true&amp;logger=com.mysql.jdbc.log.MyStandardLogger"/>
    <property name="username" value="${db.user}"/>
    <property name="password" value="${db.password}"/>
</bean>

And in the Tomcat context.xml the URL was specifed like:

<Resource name="jdbc/cbioportal" auth="Container" type="javax.sql.DataSource" maxActive="100" maxIdle="30" maxWait="10000"
        username="cbio_user" password="pass" driverClassName="com.mysql.jdbc.Driver"
        connectionProperties="zeroDateTimeBehavior=convertToNull;useSSL=false;profileSQL=true;logger=com.mysql.jdbc.log.MyStandardLogger;"
        testOnBorrow="true"
        validationQuery="SELECT 1"
        url="jdbc:mysql://localhost:3306/cbioportal"/>
Another version of MySQL logger passing SQL statements to the included slf4-compatible logger

Wildfly is different from other servers in a few respects. I have not tried to understand why, but the output from System.out.println() is not always saved to the server log. So used a similar class to log SQL statements. The jar was added as a dependency for MySQL driver. I will describe the unusual Wildfly-specific deployment of database drivers that must be installed before a dependent datasource is created in a later post.

package com.mysql.jdbc.log;

import com.mysql.jdbc.profiler.ProfilerEvent;
import java.text.DateFormat;
import java.text.SimpleDateFormat;
import org.slf4j.Logger;
import org.slf4j.LoggerFactory;

public class MySlf4JLogger extends StandardLogger {

    Logger logger = LoggerFactory.getLogger(getClass().getName());

    public MySlf4JLogger(String name) {
        super(name, false);
    }

    public MySlf4JLogger(String name, boolean logLocationInfo) {
        super(name, logLocationInfo);
    }

    DateFormat df = new SimpleDateFormat("HH:mm:ss.SSS");

    @Override
    protected void logInternal(int level, Object msg, Throwable exception) {
        if (msg instanceof ProfilerEvent) {
            ProfilerEvent evt = (ProfilerEvent) msg;
            String str = evt.getMessage();
            if (str != null) {
                logger.debug(str);
            }
        }
    }
}
Registering the logger of SQL statements in persistence.xml

This technique will nicely expose complete SQL statements with either Hibernate or Eclipselink. For example, how I use the logger in my persistence.xml used by JUnit tests.

 <persistence-unit name="JavaApplication316PUTEST" transaction-type="RESOURCE_LOCAL">
    <provider>org.hibernate.jpa.HibernatePersistenceProvider</provider>
     <class>entities.User</class>
     <class>entities.Food</class>
     <class>entities.Meal</class>
     <shared-cache-mode>NONE</shared-cache-mode>
     <properties>
         <property name="javax.persistence.jdbc.url" value="jdbc:mysql://localhost:3306/wildfly?useSSL=false&amp;profileSQL=true&amp;logger=com.mysql.jdbc.log.MySlf4JLogger"/>
         <property name="javax.persistence.jdbc.user" value="wildfly"/>
         <property name="javax.persistence.jdbc.driver" value="com.mysql.jdbc.Driver"/>
         <property name="javax.persistence.jdbc.password" value="1234"/>
         <property name="javax.persistence.schema-generation.database.action" value="none"/>
     </properties>
 </persistence-unit>

Friday, January 5, 2018

Using Microsoft .pfx certificate to enable SSL in Tomcat

To enable SSL one needs to specify a keystore with the keys to be used to secure connections. Several types of certificates and keystores exist. For Java applications the easiest option is Java keystore generated by the Java keytool. The setup of Java keystore is well documented in the Tomcat documentation. To import a .pfx certificate generated by Microsoft tools, one first needs convert it into a certificate acceptable by Java keystore. I do not do it routinely, so I make here a note that might be also useful for others.

  1. Generate a keystore in a new folder for it:
    mkdir /data/keystore/
    cd /data/keystore/
    keytool -genkey -alias tomcat -keyalg RSA
    
  2. Upload a .pfx certificate (e.g lvn00021v.pfx) to the created folder
    /data/keystore/
  3. Execute two commands to extract the certified keys (Note, you will need to enter the password for the source keystore):
    openssl pkcs12 -in lvn00021v.pfx -nocerts -nodes -out key.pem
    openssl pkcs12 -in lvn00021v.pfx -nokeys -out cert.pem
    
  4. While executing the next command to export a keystore, enter the password for the new keystore changeit:
    openssl pkcs12 -export -in cert.pem -inkey key.pem -out server.p12 -name tomcat -CAfile ca.crt -caname root
    
  5. Import the exported keystore using the same password changeit, which is default for Tomcat:
    keytool -importkeystore -deststorepass changeit -destkeypass changeit -destkeystore keystore -srckeystore server.p12 -srcstoretype PKCS12 -srcstorepass changeit –v
    
  6. To disable any not secured access to all the Tomcat hosted applications, add the following lines to the end of CATALINA_HOME/conf/web.xml:
    <security-constraint>
    <web-resource-collection>
    <web-resource-name>Protected Context</web-resource-name>
    <url-pattern>/*</url-pattern>
    </web-resource-collection>
    <!-- auth-constraint goes here if you requre authentication -->
    <user-data-constraint>
    <transport-guarantee>CONFIDENTIAL</transport-guarantee>
    </user-data-constraint>
    </security-constraint>
    
  7. Modify CATALINA_HOME/conf/server.xml:
    <Connector port="8443" protocol="org.apache.coyote.http11.Http11NioProtocol"
               maxThreads="150" SSLEnabled="true" compressibleMimeType="application/javascript,text/css,application/json" compression="on">
        <SSLHostConfig>
            <Certificate certificateKeystoreFile="/data/keystore/keystore"   type="RSA" />
        </SSLHostConfig>
    </Connector>
    

Forwarding ports 80 to 8080 or 443 to 8443 with iptables firewall

It is something I often do. So I make here a note for myself.

If you want that the user access you website via the standard http port 80 or https 443 you have few options:

  • use Appache server to forward request to your server, which will slow down your webapplication
  • run your server as root, which might be unsecure
  • use iptable service to forward the traffic arriving to the standard ports to the ports that are listened to by the server application (e.g. Tomcat, Wildfly)

It is seems to me that the option with iptables is the most straightforward. There are several ways to configure the firewall on CentOS. I use a shortcut way:

  • Edit file /etc/sysconfig/iptables as root so that it includes *nat section with the prerouting commands:
    *filter
    :FORWARD ACCEPT [0:0]
    :INPUT DROP [0:0]
    :OUTPUT ACCEPT [0:0]
    -A INPUT -m state --state ESTABLISHED,RELATED -j ACCEPT
    -A INPUT -p icmp -j ACCEPT
    -A INPUT -i lo -j ACCEPT
    -A INPUT -m state --state NEW -m tcp -p tcp --dport 22 -j ACCEPT
    -A INPUT -m state --state NEW -m tcp -p tcp --dport 8080 -j ACCEPT
    -A INPUT -m state --state NEW -m tcp -p tcp --dport 8443 -j ACCEPT
    -A INPUT -m state --state NEW -m tcp -p tcp --dport 3306 -j ACCEPT
    -A INPUT -m state --state NEW -m tcp -p tcp --dport 5666 -j ACCEPT
    -A INPUT -p icmp --icmp-type any -j ACCEPT
    -A INPUT -j REJECT --reject-with icmp-host-prohibited
    -A FORWARD -j REJECT --reject-with icmp-host-prohibited
    COMMIT
    
    *nat
    -A PREROUTING -p tcp --dport 80 -j REDIRECT --to-ports 8080
    -A PREROUTING -p tcp --dport 443 -j REDIRECT --to-ports 8443
    COMMIT
    
    Those setting also block the incomming traffic except to ports like 22, 8080.
  • Restart iptables service:
    service iptables restart

Now you can access you web application without adding :8080 to the host address.